Rolling Ball Sculpture #3…
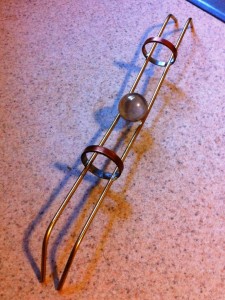
While I was waiting for paint to dry on my stereo system I decided to test out some ideas that I’ve had for the next rolling ball sculpture. My previous two pieces were both done in all copper, which I think was a good introduction into the RBS world. Now that I’ve gotten the basics down, for my next piece I didn’t just want something that was functional and kind of cool to play with. I want to make something that people look at and say, “Wow, that thing is so cool!” After searching around and looking for some interesting materials I decided on brass as the track material. I also wanted to use the bigger shooter marbles with this one, so I needed something a fair bit thicker than the flimsy copper wire I was using.
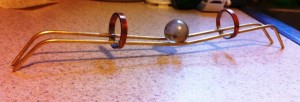 I picked up a couple of 12 inch long, 1/8″ brass rods from a local hardware store and set to it building a short little test track. I was much more analytical in my approach this time around regarding the track width. Previously I just sort of made sure the marbles wouldn’t fall through the track and went with that. I came across this site and figured out a fairly exact track width for my marble size.
One more thing I really wanted to do with this one was use more impressive track spacers. The little roller coaster type ties I was using before did their job OK, but didn’t look that cool. They were also a pain to make/install. After doing some research online as to what people are using I decided on using complete circles for the spacers, kind of like little tunnels. I was amazed when I saw this technique in the movie Fracture and think the effect is much cooler than just a straight track. I can also vary the width of the spacers to create even longer tunnels/tubes.
After doing a lot of calculations and researching available materials I couldn’t find any brass tubes/washers that would work how I wanted them to. I decided on using copper for the spacers, which I actually think gives a nice contrast with the brass and looks pretty good together. Unfortunately, with the marble size and the track needing to fit through the spacers, 1″ standard copper pipe was too narrow. It was also really expensive! I searched through the plumbing aisle at Home Depot and found the straight barrel 1″ copper pipe fittings. 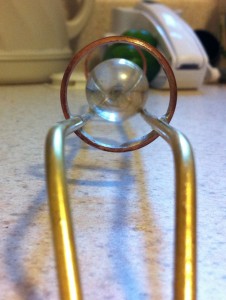 Now, because they are made for 1″ copper pipe to fit inside, they are just a tiny bit larger than 1″ and fit the track and marble perfectly. When I say perfectly, I mean the marble makes it through with probably less than 2mm of space at the top. I just have to make sure that any other marbles I get are the exact same size. I quickly soldered the track to the insides of the track spacers at the correct track width and have a nice working section of test track to play with!
I’m super excited about how this thing looks. The brass track looks amazing and has a really cool sound to it. It sounds really solid, much different than the thin copper wire. It was quite a difference working with 1/8″ rod instead of the thinner copper. I was still able to bend it by hand, but had to use some real force. I shouldn’t have to worry too much about it taking a knock and getting out of line like before. This thing is sturdy!
So I have most of the bits for the new sculpture, I just have to figure out how I want to overall thing to work. I’m thinking of a motor lift on this one, hmm…

I have been a rolling ball sculpture fanatic long before the movie “Fracture” appeared and drove the masses toward this type of art. I am much more interested in the “exactingness” of a sculpture than its “aesthetic, coolness” factor. I have sketches and notes galore and finally have some room and time to build my first design. I am very curious as to what and how you solder your brass with. Are you using silver solder and a small hand torch? Do you add a copper fitting to each and every finished length of 12″ brass rod or do you run them out? What type of forms do you use to ensure the inside and outside diameters of turns are exact?
I appreciate your information in advance and I am not trying to circumvent my own research, just trying to pick the brain of a designer that has already been there.
Have you done anything further on your design? I would love to see some photos. If you are interested, I will reciprocate with design ideas and images.
Thanks again, and the best of luck in your designs!
Scott H.
Hey Scott,
Thanks for the message, glad to meet someone else into RBSs and in brass! I think that brass sculptures look really nice and doesn’t require a welding setup in order to construct, so is much easier than steel. I unfortunately haven’t completed a full brass RBS yet, but have done a number of small test setups, so can hopefully pass on my experience and findings!
I use regular silver solder and tinning flux with the brass. Stay away from the acid flux, it made my joints look like crud. I’ve heard good things about Tix solder and flux, but I haven’t used it. It’s a jeweler’s solder, so is really expensive though, especially the amount needed for a full sculpture.
You can use either a propane torch, or a small butane torch. I started with a propane torch because that’s what I had on hand after some plumbing work and it worked fine. It heated up the joints really quickly, but the semi-large flame was tricky to control sometimes. The heat generated from it sometimes melted solder joints that were nearby, so caused some problems. I switched to a smaller pencil butane torch and it’s much easier to control. It takes a little more time on each joint, but well worth it.
To hold the track to the right width I made a few small spacer clamps. They are really simple things, but a bit hard to explain in words, so let’s see how I do! They consist of a bolt, two washers that are wider than the track width, and a nut. I used the dremel to cut two grooves in the washers at the exact width I wanted the track pieces. I lay out the two track pieces, then slide the bolt in between them with a washer on the top and one on the bottom, then put the track in the grooves that I cut in the washers and clamp them together with the nut. Simple, and works great!
Turns are something that I’ve thought a lot about too. At the moment I do a lot of eyeballing, test bending, and test rolling to get them to work. Ideally you would calculate the radius of the turn, then bend the track against a circular mold of that radius, taking in to account that the outside track will have a different radius then the inside. Seems simple, but makes for a lot of molds (I use clay flower pots because they vary in radius and are nice and stiff)! This calculation gets much more complex when you factor in the sloped corners that you may want (or need) to add in. Being a classical physics guy I enjoy these things, but it’s not for everybody!
The design for my full brass RBS is still in the works, but I have a number of drawings that I’ll see if I can get scanned in sometime. The trouble that I’m having is the underlying structure of the whole setup. The larger marbles create a surprising amount of force when rolling around, so it needs to be really stable. I’m thinking a wooden base, with either copper or brass pipes to attach the tracks to, but I’m having a difficult time locating a supply of the corner fittings for the pipe. I’m also still working on some sort of lift/elevator mechanism.
Anyway, thanks again and maybe collaborating with someone will get me back into the workshop again now that it’s getting warmer out!
Cheers,
Tim
Could you post a pic of your homemade spacer to hold track apart for soldering? Thanks